Roller shutters are a popular choice for securing homes and businesses in Australia. However, over time, the winder box can experience wear and tear, which can lead to difficulty in winding or even complete failure. In this guide, we will show you how to fix a roller shutter winder box.
Troubleshooting the Issue:
Before fixing your roller shutter winder box, it’s essential to diagnose the problem.
Some common issues with winder boxes are worn-out cords or straps, broken or rusty springs, or issues with the winding mechanism. If you are unsure of the problem, refer to the manufacturers’ guidelines in the respective document.
Replacing Cords, Straps, or Handles:
If the cord or strap has worn out or the handle no longer works correctly, you can replace it with a new one.
Repairing or Replacing Springs:
If the spring is broken or rusty, you may need to repair or replace it. The guide gives useful tips on repairing or replacing springs, as well as how to adjust them to suit your needs.
Fixing the Winding Mechanism:
If the problem is with the winding mechanism itself, you may need to repair or replace the winder box. The documents provide detailed instructions on how to install a new winder box or replace the damaged parts.
Fixing a roller shutter winder box may seem daunting, but with the right tools, guidance, and patience, it can be a simple process.
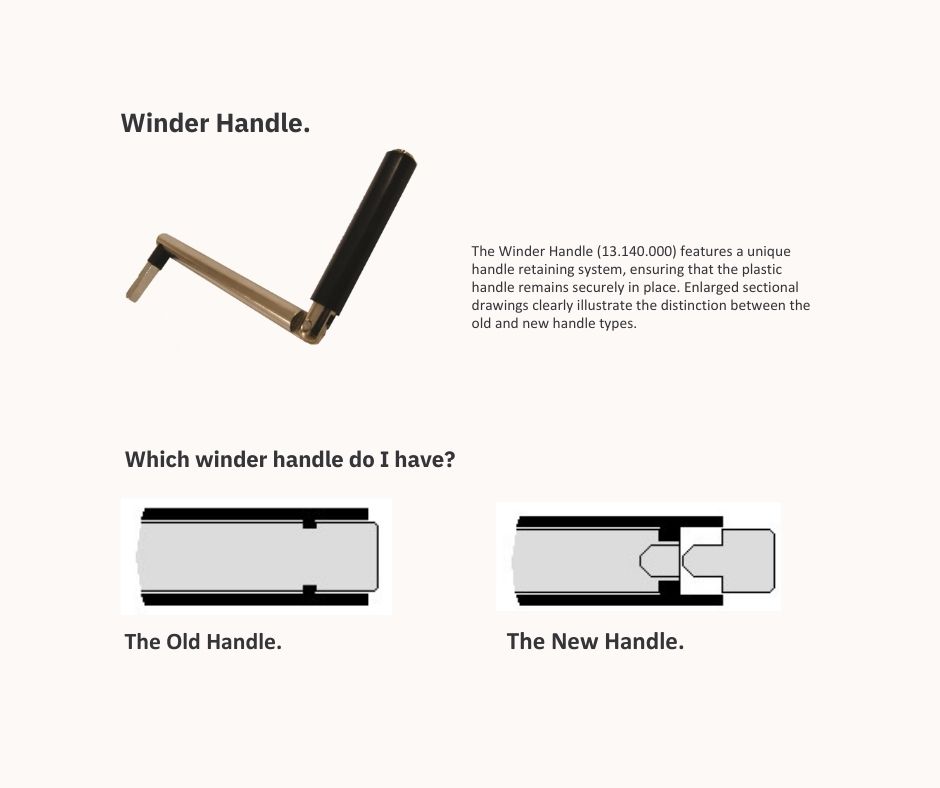
Winder Handle Replacement:
The Old Handle had a design flaw where the metal part of the handle had a small groove cut around the shaft, and the plastic handle had a corresponding retainer. However, this retainer section was small, and during production, the plastic handle had to be forced over the shaft until the retainer clicked into place. This forced installation process often resulted in permanent damage to the handle.
Moreover, the small retaining groove could quickly cut through the plastic section, causing the handle to fall off. This problem worsened in extreme heat as the plastic expanded and the tolerances increased.
On the other hand, the New Handle has undergone significant improvements. The metal shaft is now made in two pieces, allowing for a much larger retainer on the plastic handle. During production, the plastic handle is smoothly slid over the main shaft, and then the end is fitted using a press. This updated process ensures that there is no deformation to the plastic handle, and the larger plastic retainer securely holds the handle in position.
Overall, the design enhancement in the New Handle eliminates the issues of damage and detachment seen in the Old Handle. The improved manufacturing process and larger retainer provide a sturdier and more reliable handle that can withstand varying temperatures without compromising its functionality.
Cord Winder Box Replacement:
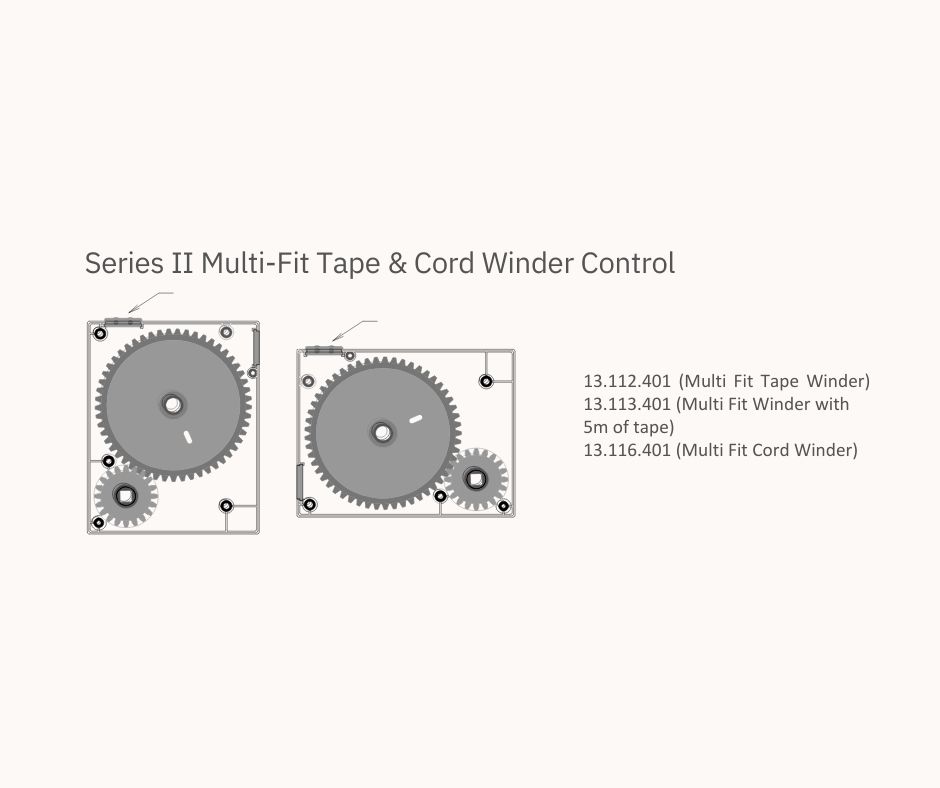
The Series II Multi-fit Tape & Cord Winder offers flexible installation options. It can be installed in either a horizontal or vertical position. By adjusting the cap and roller position, the winder can be mounted vertically, bringing the Winder Handle (13.140.000) closer to the window and aligning the tape/cord entry point directly over the handle.
The Multi-fit Winder Control comes with screw caps in a plastic bag.
The bag contains seven (7) large screw caps and two (2) small screw caps, which are inserted into the winder box after installation and testing.
During installation, three out of the four fixing holes are identical, with one having a slightly different alignment.
If the Series II Multi-fit Winder Control is replacing an old-style winder, it is recommended to use the three holes that are in alignment for ease of installation. In a new installation, there should be no issues with screw hole alignment.
For a right-side installation, five (5) large screw caps and one (1) small screw cap are used. For a left-side installation, four (4) large screw caps are used.
To remove the screw caps, it is recommended to use a tool with a sharp point, such as a retractable knife, and gently pry them out of the screw holes.
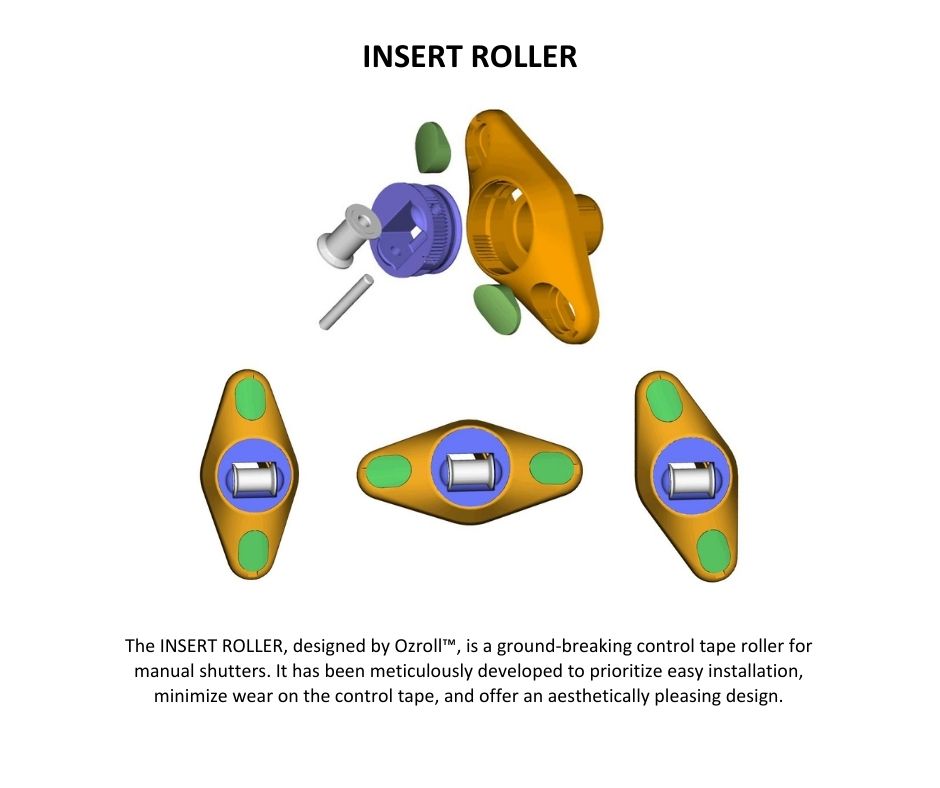
The insert roller strap part for the manual roller shutter winder strap:
The INSERT ROLLER, created by Ozroll™, is an innovative roller designed for manual shutters. Its purpose is to provide easy installation, minimize wear on the control tape, and offer a visually appealing design. Here’s what makes the INSERT ROLLER stand out:
- Retaining Flanges: The roller has special flanges on both sides that move alongside the control tape instead of rubbing against it. This design ensures minimal wear and tear on the tape, extending its lifespan.
- Removable Blue Insert: The housing of the roller includes a removable blue insert. This feature allows for the convenient removal of the roller without needing to unscrew the entire housing from the wall. It’s particularly useful for servicing the shutter and replacing the control tape when needed.
- 360-Degree Rotation: The blue insert can be rotated a full 360 degrees in 2.5-degree increments. This flexibility enables different installation options while maintaining a tidy appearance inside the home.
- Easy Stud Installation: By rotating the outer housing 15 degrees, it becomes possible to align the top screw directly into a stud. This ensures a secure vertical roller configuration without sacrificing functionality.
- Screw Caps: The finishing touch is provided by screw caps, which enhance the overall look of the roller. They should be fitted after ensuring a confident installation. To fit them easily, start by aligning the thinner end towards the outside of the roller, then press them into place.
- Convenient Packaging: Each insert roller is supplied in an individual plastic bag, which contains the Outer Housing, two Hole Caps, and the Inner Housing already assembled with the roller.
- Colour and Part Number: The insert roller is available in white only, adding a clean aesthetic to any shutter. The specific product number for this Ozroll™ innovation is 13.240.401, and it has a pending patent.
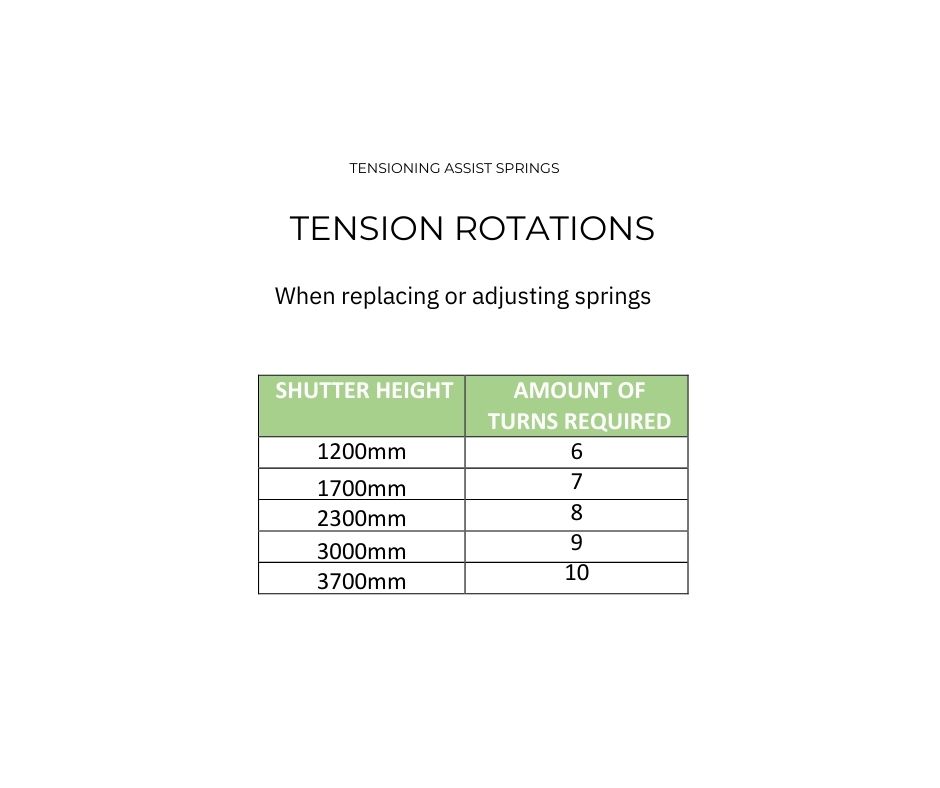
Roller Shutters Winder Springs and Tensioning Guide:
To adjust the tension of the springs correctly, follow these steps:
- Disconnect the spring fasteners from the Octagonal steel axle. Make sure to place the U shape tool provided into the crown position of the assist spring while doing this. This will prevent any movement. You can leave the curtain in place in the window and guides; there is no need to remove it.
- Depending on the required tension, remove the U-shaped tool and hold onto the Octagonal axle while doing so.
- Rotate the axle either forward or backward, completing one or more rotations as needed based on the desired tension.
- Once the assist spring is correctly tensioned, place the U-shaped tool into the crown position of the assist spring to prevent any movement while connecting the spring fasteners.
- Connect the spring fasteners to the octagonal axle.
- While holding the octagonal axle, remove the U-shaped tool and slowly release the axle. Allow the curtain to roll up to the top position of the guides, where the V stoppers hit the box end inserts. At this point, the assist spring should have the correct amount of tension/turns required.
- If the curtain is still not correctly tensioned, repeat the instructions accordingly until you achieve the desired tension.
- By following these steps, you can easily adjust the tension of the springs using the U-shaped tool provided in the kit box.
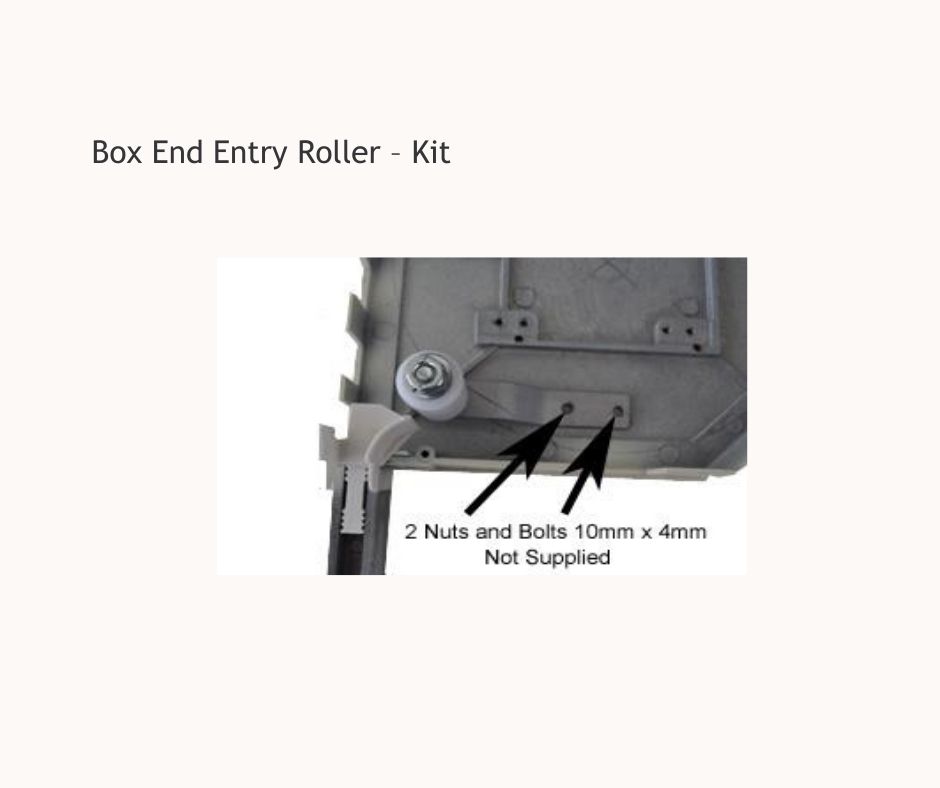
Box End Entry Roller Kit
The Roller–Kit is designed to assist the curtain when moving up and down in the guide by creating less drag.
This can be done after you have installed your Roller shutter. The position of the Roller–Kit is determined by the space left in the headbox when the curtain is in the fully up position.
When the curtain is fully up you can then mark the position of the Roller–Kit. Then put the curtain fully down and drill the 2 holes required to fix the Roller-Kit, this is required at each end of the headbox.